In early childhood education, learning is not limited to books and worksheets. Children explore the world through touch, sight, sound, and movement. One of the simplest yet most powerful tools to support this natural learning process is a DIY Texture Board.
For preschools like yours, where learning through play is a priority, texture boards can become a beautiful addition to the sensory corner, activity wall, or even classroom décor.
Let’s understand everything in detail.
What is a Texture Board?
A texture board is a flat board with different materials attached to it — each offering a unique tactile experience. When children touch, rub, press, or scratch the surfaces, they stimulate their sensory receptors.
Think:
- Soft fur
- Rough sandpaper
- Smooth satin
- Bumpy bubble wrap
- Ribbed cardboard
- Cool metal
Each texture sends a different signal to the brain.
Why Are Texture Boards Important for Preschoolers?
1️ Sensory Development
Children develop neural pathways when exposed to different textures. Sensory play strengthens brain connections that support learning, memory, and emotional regulation.
2️ Fine Motor Skills
When children rub, pinch, press, or trace textures:
- Finger muscles strengthen
- Grip improves
- Pre-writing skills develop
These are foundational skills for writing later.
3️ Language Development
Texture boards encourage descriptive vocabulary:
- “It’s rough!”
- “This feels soft.”
- “This one is sticky.”
You can introduce comparative words:
- Rougher
- Softer
- Smoother
4️ Emotional Regulation
Sensory activities calm anxious or overactive children. Rubbing textured surfaces can be soothing.
5️cognitive Growth
Children classify textures:
- Hard vs soft
- Smooth vs rough
- Warm vs cool
This builds early scientific thinking.
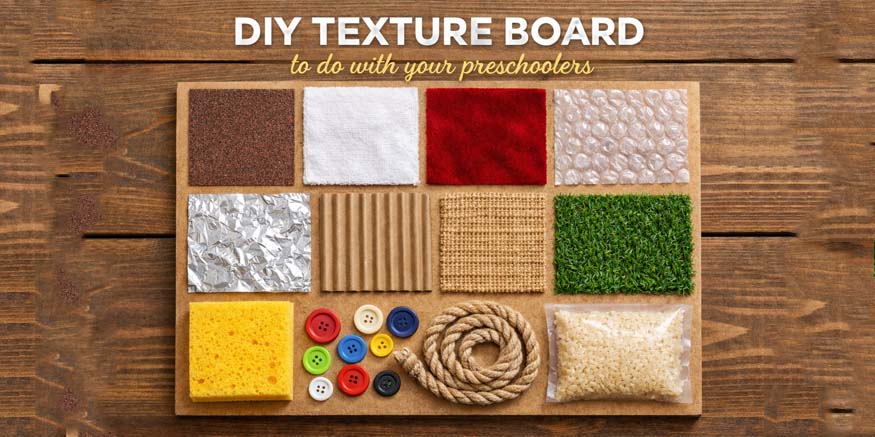
Materials Needed for DIY Texture Board
You don’t need expensive materials. Most items are easily available at home or local markets.
Base:
- Wooden board / thick cardboard / MDF sheet
- Strong adhesive (Fevicol or hot glue)
Texture Materials:
- Sandpaper
- Cotton fabric
- Velvet cloth
- Bubble wrap
- Aluminum foil
- Corrugated cardboard
- Jute cloth
- Fake grass sheet
- Sponge
- Buttons
- Rope
- Rice or dal inside sealed pouch
Make sure:
- No sharp edges
- No choking hazards
- Materials are firmly glued
Safety first always.
Step-by-Step Process
Step 1: Choose a Theme (Optional)
You can design:
- Nature theme
- Color-coded texture board
- Alphabet texture board
- Shape-based texture board
Step 2: Cut the Materials
Cut different textures into:
- Squares
- Circles
- Animal shapes
- Letters
Step 3: Arrange Before Gluing
Place all materials on the board first. Balance the spacing.
Step 4: Glue Firmly
Use strong adhesive and press properly.
Step 5: Let It Dry
Allow 6–8 hours to dry completely.
Creative Variations
1️ Alphabet Texture Board
Each letter made with a different texture.
Example:
- A – Sandpaper
- B – Cotton
- C – Foil
Helps with phonics and tactile learning.
2️ Colour + Texture Combo
Red velvet
Blue sponge
Green grass
Teaches colour recognition along with touch.
3️ Emotion Texture Board
Soft = Happy
Rough = Angry
Smooth = Calm
This connects sensory learning with emotional understanding.
4️ Guess & Feel Game
Blindfold the child and let them guess the texture.
Excellent for:
- Focus
- Sensory awareness
- Vocabulary building
How to Use Texture Boards in Preschool
- Keep it in sensory corner
- Use during circle time discussion
- Include in free-play time
- Pair it with storytelling
- Use during settling period for anxious children
Teachers can ask:
- “Which one feels the softest?”
- “Can you find something rough?”
- “Which texture do you like the most?”
Learning Outcomes
By regularly using texture boards, children develop:
✔ Better sensory processing
✔ Improved hand strength
✔ Expanded vocabulary
✔ Stronger observation skills
✔ Emotional calmness
✔ Early scientific thinking
Pro Tips for Teachers & Parents
- Rotate materials every 2–3 months
- Keep hygiene in mind (wipeable materials are better)
- Encourage descriptive talking
- Observe which texture children prefer
- Don’t force touching if a child is uncomfortable
Every child processes sensory input differently.
Final Thoughts
A DIY texture board may look simple, but its impact on early childhood development is powerful. It encourages curiosity, strengthens motor skills, supports emotional regulation, and builds vocabulary — all through playful exploration.
In preschool education, the smallest tools often create the biggest learning milestones.
Because sometimes, learning begins with just a touch.
For more such learnings, read our blogs at www.lilmiracles.in
Riitu Sharma
Co-founder
Li’l Miracles International Preschool